Common flash mistakes in the studio

Common flash mistakes to avoid

(and how to fix them):

Studio photography can feel like a constant learning curve. When using flash in the studio, it’s not just a matter of turning on a few lights. Off-camera flash, when controlled correctly, can create amazing lighting effects. However, when not correctly controlled, flash can make you look like an amateur. Below are six common flash mistakes you should try to avoid, with a little information on how to correct them.

Here are some common flash mistakes to avoid (and how to fix them):

1 – Hard shadows on the background:

Sometimes, hard shadows in photography can be intentional. They can be used to create shape, emphasis dimension or add dramatic effect. When not done intentionally though, it can look incredibly unprofessional in headshots and portraiture. A big, harsh shadow of a head on the background can be incredibly distracting and shows you haven’t considered the lighting fully.

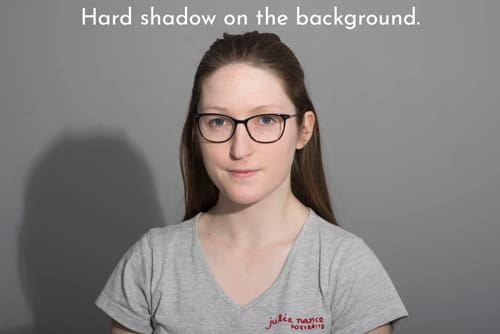
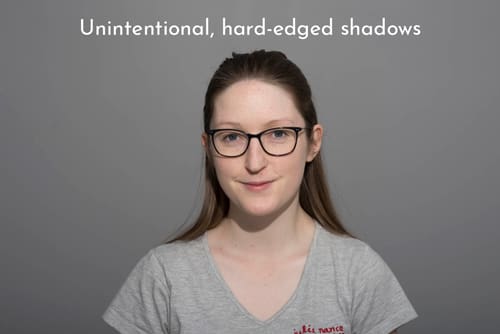
2 – Dark shadows on the face:

This is a common problem for photographers new to the studio. Deep shadows on the face that aren’t planned, or flattering. Sometimes darker shadows can be intentional, and give a dramatic effect.

Not understanding lighting and light ratios can result in a more unplanned and unpleasant result though. Take the below examples:

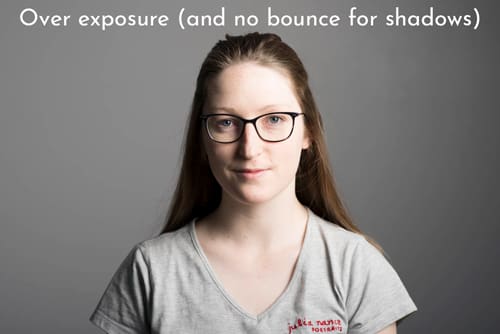
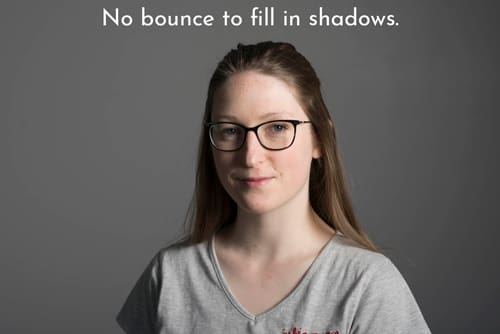
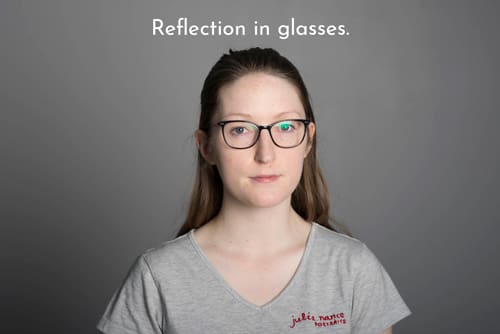
In each of these examples, we can see that the shadows are incredibly dark. The shadow lining the left side of the nose, and the inner eye are particularly distracting. In the image on the left, we can also see that the key light coming from the left was too bright. The right side of the face is overexposed, and there is little detail in the skin. On the right image, the skin tone is better exposed with more detail, but we still have those deep shadows distracting us.

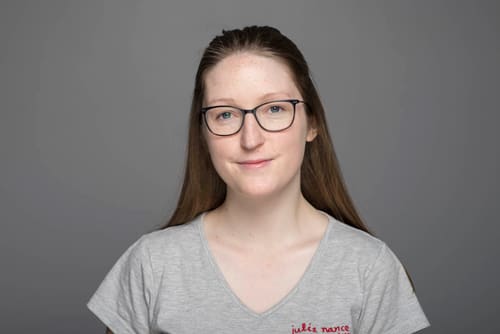
To improve on these images, and to avoid this mistake, a simple solution is to fill those shadows with light. This can be done either by bouncing/reflecting light back into that side of the face or by adding an additional light to brighten those areas.

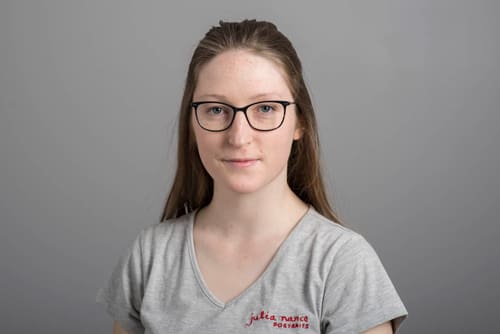
You can see in this image how a simple reflector brings light back into the left side. I use polyboard – which is just basically a big sheet of foam. I bought mine from a warehouse that specialised in EPS home insulation. The boards are big enough to reflect light back into a full body shot. They’re sturdy but won’t hurt anyone on the chance they fall.

If you don’t have one of these, a simple reflector will do the job. Any white surface can reflect light back in. Just play with the angles and distance until you get it right.

3 – Hot spots:

Hot spots are common with studio flash. When using a diffuser like a softbox, hot spots can occur, and often hit areas like the forehead, top of the head in bald men, and the nose and chin. These hot spots can blow out the face, and look quite unpleasant.

So to reduce hot spots, it usually involves tweaking the light and making it softer. This can be done by moving the brightest part of the softbox away from the face. Feathering the light so that the edges of the diffused light source are hitting the face is simple to reduce a hot spot. In the above image, the light was in front of the face. It could be feathered by angling the softbox up or down so that the brightest (or hottest) part of the light was not angled directly onto the face.

To understand feathering a little more, check the diagrams which show the feathering of a key light coming from the side. The feathered softbox is angled slightly away from the subject’s face, rather than directly in line with it.

4 – Wrong shutter speed:

When in the studio using flash, typically (although not always) you are using only the light from the strobes to expose the image. This means that the duration of the flash is what exposes your image.

For high-speed photography, like capturing a splash, or a water balloon exploding, it is usually the incredibly short flash duration that allows the effect to be captured. Not a fast shutter speed. In fact, all my images of splashes have been taken on bulb mode, of several seconds, while in a dark studio. The high-speed flash captured the split-second action.

Moving back to portraiture, this means using a high shutter speed usually will not affect your images at all. It won’t help freeze the motion. In fact, using a shutter speed that is too high can cause a black band at the bottom/side of an image.

This black band is the shutter curtain. When the shutter speed is set to be faster than the flash sync speed of the camera, we get this result. What happens is that the shutter is too fast for the flash to fully expose the image. We get the black bar, which is actually the shutter itself.

Making sure you understand your camera’s flash sync speed is important. If you’re noticing this effect in your flash images, then perhaps slow down that shutter!

5 – Hard-edged shadows (that are unintentional).

These types of shadows can be another distracting element to portrait and headshot photography. Of course, hard shadows can be a stylistic choice, but generally, they flow with the aesthetic of the shoot. When it comes to headshot photography, harsh shadows, like below, can come off a little unflattering.

In particular, with this image, the hard shadow under the chin and from the glasses are not super flattering. To solve this problem, simple diffusion of the light is a good starting point to reduce those harsh lines.

6 – Reflections in glasses:

A lot of people wear glasses, and for a headshot photograph to stay recognisable, they want to keep their glasses on in their photographs. This only makes sense, so as a photographer being able to understand and control studio lighting to avoid those distracting glasses reflections is important.

If you’re continually showcasing work with these glasses reflections, it reflects quite poorly on your lighting ability.

Understanding how lighting and reflections work is the key to managing this hurdle. It is all about the angles of the light and the camera. The angle of reflection is equal to the angle of incidence. Do you remember this from physics? I am sure there are plenty of resources on youtube to explain this further.

Understanding this is key when setting your lights, and your camera position. Your subject’s head angle and position will also come into play here too. It is all about adjusting and understanding how light hitting the glasses will reflect back. To sum it up, you need to make sure that the angle of incidence isn’t hitting into your lens.

Tweaking the lights, asking the subject to tilt their chin slightly up or down, or moving the height of the camera can all solve these issues. Of course, knowing what light setups work well for glasses wearers is great to have up your belt too.

So there you have it. There are so many things to learn in the field of studio and flash photography. The best way to learn and understand is by practising and doing. There are plenty of resources on the internet to get you on your way with lighting.

It’s your job to get into the studio and put them into practice. If you’re new to photography, have a read of some more tips for getting your business started!

See more tips and advice on my blog, or check out my full folio of headshots and portraiture.

Julia Nance - portrait of the photographer on blue background wearing orange T-shirt

Julia Nance is a headshot and portrait photographer based in Melbourne, Australia. Her vibrant creativity is inspired by her experiences. From photographing whales underwater to travelling in Europe. With a vast background in a range of photographic areas, it is Julia’s natural ability to connect with her subjects that ultimately drew her to the art of portraiture.
Corporate Headshots | Personal Branding | LinkedIn Headshots | Actor Headshots

Published by

Julia Nance

Julia Nance is a headshot and portrait photographer based in Melbourne, Australia. Her vibrant creativity is inspired by her experiences. From photographing whales underwater to travelling in Europe. With a vast background in a range of photographic areas, it is Julia’s natural ability to connect with her subjects that ultimately drew her to the art of portraiture.Corporate Headshots | Personal Branding | Actor Headshots | LinkedIn Headshots |
Prev Meet Matt - Melbourne Actor.
Next Actor Headshots: posing tips

Comments are closed.